Overview
This guide shows how to setup Foundry Virtual Tabletop (VTT) on your own PC inside a Linux Ubuntu configuration. This meets my own particular use case where I host one game a week for about six players running about 4 hours per session.
These instructions can be complicated for a novice PC user, so it is assumed you are a power user capable of configuring your router, firewall, installing and configuring software from a Linux command prompt (see requirements below).
My goal was to minimize cost while being able to fully host the game, including audio. This guide can accomplish that with the only expense being the Foundry VTT software license, your existing internet hosting service and the cost of a fully qualified domain name.
At the end of completing all the steps below you will have the following:
- A self-hosted Foundry VTT server on your PC
- A free integrated A/V server running on a separate host
Requirements
This guide assumes that you already have installed linux, and have at least a basic understanding of how to use the command line.
The following is required to complete this guide:
- A modern Linux distribution installed with a minimum of 2GB of RAM
- Ability to use your PC as a host server, which requires:
- Stable internet connection with a static IP address. See note on Port Forwarding
- Valid domain name:
- You will need to register for one online and have the ability to configure it. This guide uses Amazon Web Services (AWS) and Route 53.
The Foundry minimum requirements are 2GB RAM with 4GB recommended. Note that if you have other applications/services/etc that are using RAM in addition to Foundry, please consider more than 2GB. Essentially any CPU with at least one core should work.
Port Forwarding
If you are planning to host on a PC on your home network, please double check that you are able to port forward. This guide assumes that you have already confirmed the ability to host on your home network, and set up port forwarding (if needed).
If hosting on a PC on your home network, confirm your ability to host before continuing with this guide.
See the Foundry documentation on Port Forwarding for more info. You'll need to forward port 30000 (TCP) for just Foundry access, 80 (TCP) and 443 (TDP + UDP) for the Caddy reverse proxy. For connecting with LiveKit you will also need to forwards port 7880-7881 (TCP), 3478 (UDP), and 50000-60000 (UDP).
You must also set inbound rules on your firewall such as Windows Defender to ensure these ports are accessible.
This guide does not cover port forwarding, nor is it an alternative to port forwarding. If hosting on your PC at home over IPv4, you will need to port forward.
WSL 2 Port Forwarding
To forward ports in WSL2 (Windows Subsystem for Linux), you need to configure port forwarding using the netsh command in PowerShell. This allows you to access services running in WSL2 from your local network or other machines (this is required for Self-Hosting from WSL2).
The IP address for WSL2 may change after your computer reboots, or WSL2 is shut down and restarted. To simplify running the netsh commands required, do the following:
- Create a text file with the extension
ps1with the following script:
$remoteport = bash.exe -c "ifconfig eth0 | grep 'inet '"
$found = $remoteport -match '\d{1,3}\.\d{1,3}\.\d{1,3}\.\d{1,3}';

if( $found ){
  $remoteport = $matches[0];
} else{
  echo "The Script Exited, the ip address of WSL 2 cannot be found";
  exit;
}

#[Ports]

#All the ports you want to forward separated by coma
$ports=@(80,443,"7880-7881",3478,"50000-60000",30000);


#[Static ip]
#You can change the addr to your ip config to listen to a specific address
$addr='0.0.0.0';
$ports_a = $ports -join ",";


#Remove Firewall Exception Rules
iex "Remove-NetFireWallRule -DisplayName 'WSL 2 Firewall Unlock' ";

#adding Exception Rules for inbound and outbound Rules
iex "New-NetFireWallRule -DisplayName 'WSL 2 Firewall Unlock' -Direction Outbound -LocalPort $ports_a -Action Allow -Protocol TCP";
iex "New-NetFireWallRule -DisplayName 'WSL 2 Firewall Unlock' -Direction Inbound -LocalPort $ports_a -Action Allow -Protocol TCP";

for( $i = 0; $i -lt $ports.length; $i++ ){
  $port = $ports[$i];
  iex "netsh interface portproxy delete v4tov4 listenport=$port listenaddress=$addr";
  iex "netsh interface portproxy add v4tov4 listenport=$port listenaddress=$addr connectport=$port connectaddress=$remoteport";
}

# show the port forwarding configuration
iex "netsh interface portproxy show v4tov4";
- Add the path to this script text file to your Path system environment variables. This will enable you to run it from the command-line from any path.
- Launch the PowerShell with Administrator access and then run the script. This will open the ports with the correct WSL2 IP address.
- Check the IP address for WSL, if it does change you will need to update the IP address for your A record for the DNS.
Preferred Linux Distribution
If you do not have a strong reason for another distribution, Ubuntu version 24.04 is recommended. The current version of Foundry VTT requires a minimum of version 22.04.
This guide was designed for a system running the Ubuntu distribution of Linux running in the Windows Subsystem for Linux (WSL), version 2. If you do not have WSL 2 installed see the Microsoft documentation on How to install Linux on Windows with WSL.
Installing WSL 2 requires virtualization to be turned on in your PC BIOS. Check out this guide on How to Enable Virtualization in BIOS for Windows 11 (or look for similar guides for your operating system).
User and General System Setup
Objective
At the end of this section, you will have a non-root user setup to run Foundry as well as the necessary software to run Foundry managed behind a reverse proxy.
User Setup
We must use a non-root user that is part of the sudoers group to properly continue and manage Foundry.
If you are certain that you have a non-root user that has access to sudo then you may skip the next steps and continue to System Setup.
- Firstly, check your Linux terminal to determine which user you are logged in as. Your terminal should look like:
<user>@<servername>:_
- Click the heading for your linux distribution to expand the commands to create a new user. We will create a user named
foundryand add them to sudoers. Choose a strong password for the user that you will remember.
You can leave all other fields blank or fill with whatever info you'd like:
adduser foundry
usermod -aG sudo foundry
- Assume the new user by:
su - foundry
You should now see the terminal look like:
foundry@<servername>:_
System Setup
We will now install the necessary software to run and manage Foundry behind a reverse proxy. This includes:
nodejs, required to run Foundry itselfcaddy, the webserver that will be used as a reverse proxypm2, the process manager will keep Foundry runningunzip, the utility used to decompress the Foundry installation zip archivenano, the text editor used to edit configuration files
To continue, you must be using a non-root user with sudo access. If that is not the case, please review the steps in User Setup.
- First, let's update the system to make sure we have everything as up-to-date as possible. This may take a few minutes.
sudo apt update
sudo apt upgrade -y
You may be asked for a password the first time you use a sudo command. This is normal. Enter the password for the user.
If after entering the correct password, you receive an error: <user> is not in the sudoers file or similar, then you must login as root and complete the User Setup.
- Add the
nodejsv22 repository to the system package manager:
sudo apt install -y ca-certificates curl gnupg
sudo mkdir -p /etc/apt/keyrings
curl -fsSL https://deb.nodesource.com/gpgkey/nodesource-repo.gpg.key | sudo gpg --dearmor -o /etc/apt/keyrings/nodesource.gpg
echo "deb [signed-by=/etc/apt/keyrings/nodesource.gpg] https://deb.nodesource.com/node_22.x nodistro main" | sudo tee /etc/apt/sources.list.d/nodesource.list
- Add the
caddyrepository to the system package manager:
sudo apt install -y debian-keyring debian-archive-keyring apt-transport-https
curl -1sLf 'https://dl.cloudsmith.io/public/caddy/stable/gpg.key' | sudo gpg --dearmor -o /usr/share/keyrings/caddy-stable-archive-keyring.gpg
curl -1sLf 'https://dl.cloudsmith.io/public/caddy/stable/debian.deb.txt' | sudo tee /etc/apt/sources.list.d/caddy-stable.list
- Install
nodejs,caddy,unzip, andnano:
sudo apt update
sudo apt install nodejs caddy unzip nano -y
- Check that
nodejsandnpmare installed and the correct versions:
node --version
npm --version
node should return a version of 20 or greater. The npm version doesn't matter, but should return something.
- Install
pm2:
sudo npm install pm2 -g
- Add
pm2to startup as the current user:
pm2 startup
REQUIRED STEP
You will need to carefully review the output of the pm2 startup command. It will include a specific instruction on how to enable pm2 startup on your particular distribution. Copy and paste this command exactly.
Foundry and Reverse Proxy Setup
Objective
At the end of this section you will have a functional installation of Foundry using HTTPS and Caddy as a reverse proxy. Foundry will be set to restart any time the server is restarted, managed by pm2.
Download, Install, and Test Foundry
- Login to FoundryVTT and navigate to the Purchased Licenses page.
- Select the recommended version and NodeJS in the downloads options. Click on the
Timed URLbutton to copy a download url.
Be sure to click the Timed URL button and not the Download button to copy and authenticated temporary download link. This link will expire in 5 minutes, after which it will need to be copied again from the gear.
- Run the following commands, pasting the download url where you see
<download url>. In most terminals, you can right click to paste the copied url.
mkdir ~/foundry
wget --output-document ~/foundry/foundryvtt.zip "<download url>"
Make sure to include the quote symbols before and after the <download url> or the file may not download properly.
- Once downloaded, extract Foundry and cleanup the zip file:
unzip ~/foundry/foundryvtt.zip -d ~/foundry/
rm ~/foundry/foundryvtt.zip
If you get an error when unzipping Foundry, please ensure you've downloaded the Linux/NodeJS version and if not, repeat step 2 above.
- Create the User Data folder for Foundry to store data:
mkdir -p ~/foundryuserdata
- Test that Foundry runs successfully by running the following command. Replace the
<user>portion with the name of the user currently being used.
cd ~
node foundry/main.js --dataPath=/home/<user>/foundryuserdata
Foundry v12 and earlier or MODULE NOT FOUND ERROR
The location of main.js changed for the NodeJS package (only) in Foundry v13 and onward. In all other packages, such as the Linux package, the launch command for main.js will need to be modified to:
node foundry/resources/app/main.js --dataPath=/home/<user>/foundryuserdata
Both the command in this step and in C10 will need to be modified.
- You should see these info lines at the end of the output, indicating that Foundry is successfully running.
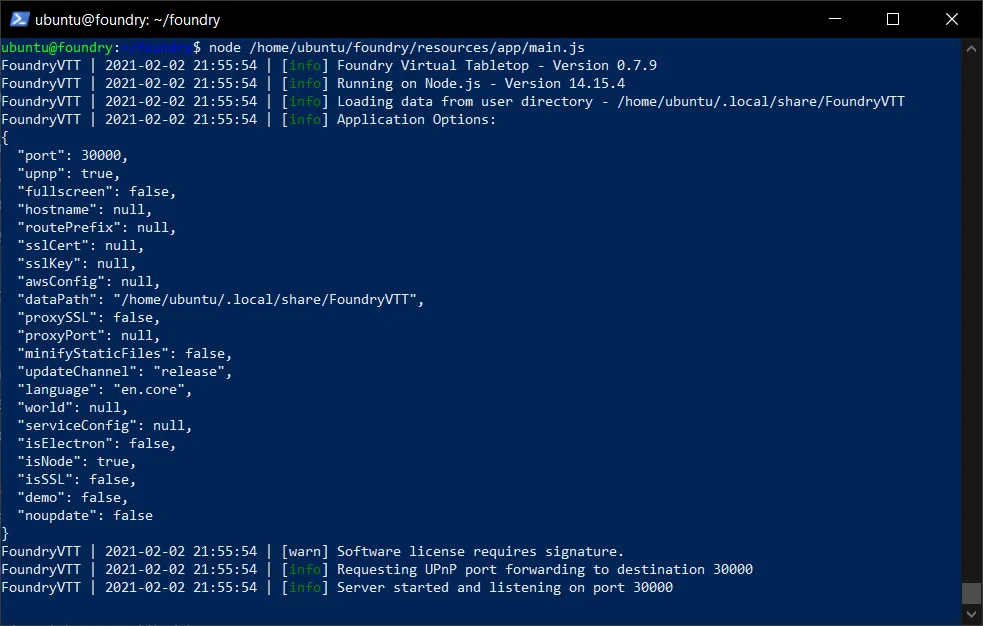
If you do not see the above output ending with Server started and listening on port 30000, review step 6 above to ensure you replaced <user> with the current user.
- Test the connection to Foundry by opening
http://<IP address>:30000in a new browser tab, where<IP address>is the either the external IP address of your cloud server or server internal IP address in your home network.
If you are setting up a server on your local network, use the local/internal IP address of the server. If you are setting up a server in the cloud, use the public IP address of the server.
You should see a Foundry screen asking for a license key at this point. If you do not see a Foundry screen at this point likely the your linux distribution or cloud provider has a firewall enabled that is blocking port 30000, or an incorrect IP address was used. Check the IP address carefully and otherwise review the documentation for your linux distribution or cloud provider for how to open port 30000 in the firewall.
- In the terminal window, press
ctrl-cto stop the Foundry test. You should see the last few lines as below, and a blinking cursor at<user>@<server>:~$. - We will now set Foundry to be managed by pm2 so that Foundry will always be running, even in the case where the instance has been restarted. To do so, run the following command. Be sure to replace
<user>with the name of the actual user. There are two replacements:
pm2 start "node /home/<user>/foundry/main.js --dataPath=/home/<user>/foundryuserdata" --name foundry
- Double check pm2 has launched Foundry correctly:
pm2 list

If the status column does not show online then review step 10 above before continuing.
- Save the current pm2 configuration so that it can manage and restart Foundry as necessary:
pm2 save
You can recover a saved configuration with the following command:
pm2 resurrect
Set up the Caddy Reverse Proxy
We recommend that you have a valid domain name with an A record pointing to <public IP address> to complete this section. If you do not have a domain name, you can use a service like Duck DNS to get a free domain and point it to <public IP address>. (see guide if you are hosting on a home network)
Having a valid domain name results in an HTTPS connection without insecure connection warnings from your web browser.
If you do not have a domain name, you may continue with this section which will set up self-signed certificates for the bare IP connection to your host, allowing an HTTPS connection but one that will prompt browsers to show a warning before clicking through to connect.
- Run the following command to begin editing the Caddyfile:
sudo nano /etc/caddy/Caddyfile
- Delete all the text, and replace it with (making sure to replace the
your.hostname.comportion with your actual domain name, do NOT puthttp://orhttps://in front of it). If you do not have a domain name, leave the text as-is without modification.
You can delete text in nano by using the arrow keys to move the cursor and pressing the delete or backspace keys to delete text.
Do not modify the https:// { ... } block at all, whether you have a domain name or not.
# This replaces the existing content in /etc/caddy/Caddyfile

# A CONFIG SECTION FOR YOUR HOSTNAME

your.hostname.com {
    reverse_proxy localhost:30000
    encode zstd gzip
}

https:// {
    tls internal {
        on_demand
    }

    reverse_proxy localhost:30000
    encode zstd gzip
}

# Refer to the Caddy docs for more information:
# https://caddyserver.com/docs/caddyfile
- Press
ctrl-xthenyandenterto save your changes. - Restart Caddy to pick up the new settings by:
sudo service caddy restart
Caddy handles all forwarding to HTTPS as well as the encryption certificates. No further configuration is needed to get those working.
- Tell Foundry that we are running behind a reverse proxy by changing the
options.jsonfile. Open the file for editing by:
nano ~/foundryuserdata/Config/options.json
- Find the
proxySSLandproxyPortparameters, and change them as below. Leave all other options as they are. Thehostnameparameter will tell Foundry to use a hostname in the Internet Invite Link. Replace<your.domain.name>with your actual domain name, if you have one. If not then do not modify thehostnamefield.
...
"proxyPort": 443,
...
"proxySSL": true,
...
"hostname": "<your.domain.name>",
...
Make sure your hostname is in quotes as above, and be sure not to delete any commas or other JSON elements while editing this file. Change ONLY the values afer the :
- Press
ctrl-xthenyandenterto save your changes. - Restart Foundry to pick up the changes to configuration:
pm2 restart foundry
- Test your site by opening a new browser tab to
http://your.domain.nameorhttp://server.internal.IP.address. Your browser may show a warning when connecting to the bare IP though you should be able to click through it. If everything is working, you will see Foundry load and the site will have the encrypted lock icon. It is now ready for use and no further configuration is needed.
Sometimes DNS records can take a few minutes and up to a couple hours to be recognized across the internet. If you receive an error along the lines of server IP address could not be found or having trouble finding that site then the DNS records may just need more time. Wait a few minutes and try again.
If the connection is refused, you may need to open ports 80 and 443 in your OS firewall and then either your provider's network security settings (if cloud hosted) or through port forwarding on your router (if hosting at home).
If you are hosting on your home network, you must use an external device to test the connection to the domain name. You can only test the connection to the internal IP address from within the network.
This concludes the portion of the guide that sets Foundry up and running. You may now continue using Foundry this way without issue going forward.
Self-Hosting LiveKit Audio/Video Server
Objective
This guide will show how to setup a LiveKit A/V server on an existing Linux server for FoundryVTT. This guide assumes you already have a working self-hosted Linux server set up from the previous steps.
The instructions below use the free plan for LiveKit Cloud. It allows for up to 50GB of bandwidth per month, and up to 5,000 connection minutes (this is the sum of all participant session durations).
I am only using audio for a small group, so the 50GB bandwidth limit is far more than I need. The 5,000 connection minutes is more relevant and likely to cause me to hit my limit. This time also gets used up when you work on the site without any players present, so to save time the A/V server should be disconnected. I'm aiming to run up to 4 sessions a month for ~4 hours per session. I'll hit that monthly limit if I have over 5 people, including myself: 5 x 4 x 60 = 1,200 minutes per session x 4 = 4,800 minutes.
Unfortunately, upgrading with the LiveKit Server jumps from free to $50/month which is too steep. Fortunately, it is possible to self-host LiveKit. There is a much cheaper alternative for this using a hosting service. I have used Amazon Web Services (AWS), which I can leave deactivated until I hit this threshold and turn it on for perhaps one session a month if I need it.
Instructions to self-host a LiveKit server can be found from the LiveKit Foundry module wiki: https://github.com/bekriebel/fvtt-module-avclient-livekit/wiki. This document only covers the free LiveKit server and the module settings.
Requirements
Using a LiveKit A/V server integrated with Foundry VTT requires that you host the site with a SSL certificate. You should have that working via the Caddy reverse proxy from following the previous steps.
Even with that working, each user must accept the connection to the A/V server for their web browser (they should be prompted for this when they first connect to the site).
Create a LiveKit Cloud Account and Create API Key
- Click on the Start for Free button on the LiveKit Cloud website to create a new account.
- On your account page, select API Keys from the Settings tab.
- Create an API key or use the default key created with the account.
- Click on the API Key and take note of the following values:
Websocket URL
API Key
API Secret
Install LiveKit Module for Foundry
- Install the LiveKit AVClient module from the Add-on Modules Tab in Foundry
- Open a world file and enable the LiveKit AVClient module in the module configuration tab.
- Open the Core Configuration Settings and click on Configure Audio/Video.
- Click on the Server tab and input the following settings:
LiveKit Server Address:  <Websocket URL>
LiveKit API Key:         <API Key>
LiveKit API Secret:      <API Secret>
- Enable Audio/Video on the General tab to connect to LiveKit.
- If you want players to have voice activation rather than push to talk, each player will need to configure that in their own A/V settings. Additionally, to talk and have video, you will need to enable that ability for players in the permissions settings.
For the Audio/Video configuration settings I recommend using Audio Only and Voice Activation. Each user can configure their own settings on where they want to dock the A/V interface and what nameplates to display.